Obligatory Jekyll Install and Setup Post
I noticed that almost everyone that creates a Jekyll-based blog also creates a how-to install Jekyll post. It’s a bit kitschy, but it’s an Internet tradition! My post combines instructions found on the following pages, it probably doesnt really contain anything new, but, as far as I can tell, it is the “proper” way to install Jekyll.
The post combines instructions found on the following pages. And, as far as I can tell, it is the “proper” way to install Jekyll.
- Jekyll GitHub Pages
- Setting up your Pages site locally with Jekyll
- GitHub Pages Ruby Gem
- rbenv
- Ruby Build Compile and install Ruby
- ruby-build-github
- Dependency versions
Install Homebrew
ruby -e "$(curl -fsSL https://raw.githubusercontent.com/Homebrew/install/master/install)"
Install Ruby vs Github Flavored Ruby
This is an important bit… While setting up my local Jekyll blog environment I ran across the following documentation on the Github-pages Gem repo.
Although Jekyll itself may be compatible with prior or future versions of Ruby, different execution environments yield different results. Ruby 1.8.7 parses YAML differently than 1.9.3, for example, and Kramdown has trouble processing mailto links prior to 1.9.3. In order to ensure that building locally consistently results in the same build as what appears when published, it’s essential that Ruby itself is versioned along side the Gem, despite no known incompatibilities.
This seems pretty explicit about using a particular Ruby build which is in stark contrast to the documentation on Using Jekyll with Pages.
So you can brew install ruby (below) which will install a recent Ruby formulae and it should work in most cases. Or you can follow my post on how-to install Github Flavored Ruby for Github-Pages to install the specific version of Ruby that GitHub runs for Pages.
Moving on, install Ruby.
brew install ruby
Create Repo on Github and Clone to local
Create a clean repo on Github and name it <username>.github.io
- Create a Github repo name
<username>.github.io - Create a Readme file, if you’d like
- Select a License
- Note: You don’t need to create a .gitignore. Jekyll will create one for you.
Clone to local machine
git clone https://github.com/<username>/<username>.github.io.git
Install GitHub Pages Gems
Create a Gemfile in your local clone of <username>.github.io
cd <username>.github.io/
touch Gemfile
nano Gemfile
And paste the following
source 'https://rubygems.org'
gem 'github-pages'
Install bundler
gem install bundler
Then bundle install the dependencies. This will install Jekyll and all the Github-Pages specific dependencies.
cd <path-to-your-project>
bundle install
Scaffold basic Jekyll site
The local
jekyll new -f ./
Serve up the site
jekyll serve --watch
Open site in your browser: http://localhost:4000
Commit and Push
git status
git add .
git status
git commit -m 'clean Jekyll install'
git push origin master
Improve the .gitignore
- Go to: https://www.gitignore.io
- Add OSX configs to .gitignore
Customize site configs
- Open
_config.yml - Set title, subtitle, description etc
Enable GitHub Flavored Markdown for Kramdown
Add the following to the _config.yml
kramdown:
  input: GFM # http://kramdown.gettalong.org/parser/gfm.html
Setup TravisCI
Login or create an account on https://travis-ci.org/. Enable the build on each commit.
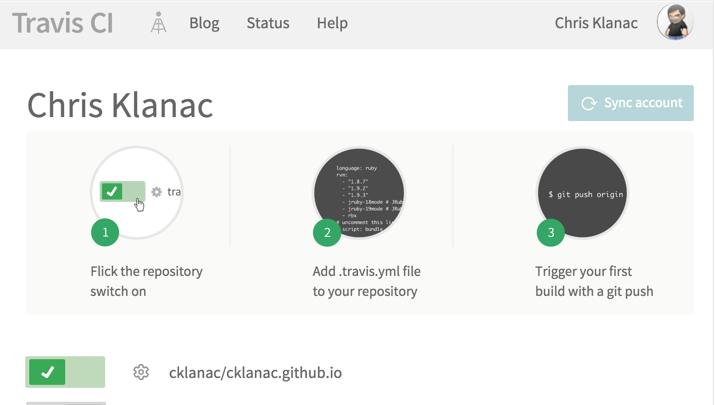
Create a .travis.yml in the project root and paste the following instructions
language: ruby
script: "bundle exec jekyll build"
Add the following to the _config.yml _
exclude: [vendor]
Updating Github-pages
To keep Jekyll and it Github-page up-to-date, run:
bundle update github-pages